Thursday, May 30, 2013

The "No-Poo" alternative to Shampoo. AMAZING!!!

So I've been experimenting with different techniques to try to maintain my bright red hair for longer. My first attempt was DIY Dry Shampoo, which has helped me go longer between washing my hair, but the sulfates in regular shampoo really do a number on my hair color, so I researched different recipes for DIY, sulfate-less shampoo and conditioner.  I found a lot of different ideas, but none intrigued me more than "No-poo."


I found the idea here. It's an extremely informative write-up about the subject, covering any question you might have. I highly recommend reading this if you're considering trying this method out. I didn't want to try to keep baking soda dry while using it in the shower so I used an old black pepper container; the kind that has 2 sides- one with the little holes and one with a wide opening. That way I can easily pour out what I need while the rest stays dry in a container that is not made out of cardboard.


No-Poo Shampoo:

1 cup water

1 tbsp baking soda

Conditioner:

1 cup water

1 tbsp apple cider vinegar
(you can use white distilled vinegar, too, but I use that ALL the time on other things and I had apple cider vinegar laying around just waiting so I went with that.)

I bought some ketchup and mustard squirters you can get at the dollar store in a pack of 2 and used those. The long, skinny opening at the top works really well for getting straight to your scalp.


Mix the baking soda and water in the squirter, shake it up so it's mixed together, and apply to your hair paying special attention to your roots. It should have a sort of slimy feel to it. If it doesn't, you might need more baking soda. I let it sit for about a minute or two and then rinse it out. Then, you mix the vinegar and water in the other squirter, shake it up so it's mixed together and apply to your hair paying special attention to your ends. The point of the vinegar is to neutralize the ph balance of your hair that the baking soda has thrown off. I let that sit for the rest of my shower and then rinse.


Seriously, this post answers any question you might have so I'm not going to waste time on fumbling out words when it's explained so perfectly elsewhere. I'm just going to share my experience and some tips I used to make the transition easier.

Let me start by telling what an amazing transformation my hair has had. I know this all sounds a little extreme, but I have had such luck with this method. I've used it almost exclusively for a couple months now and my hair feels absolutely amazing. There are so many pros to going this route that I've seen firsthand:

  • My hair holds style MUCH longer
  • Little to no product is needed to make my style hold
  • More natural volume
  • Less oily
  • No more frizz
  • More shine
  • Less hair loss
  • Hair color fades SO much slower
  • I wash my hair way less often
  • No chemicals
  • SO inexpensive
  • My hair is SO soft!
I got my hair cut and colored the other day so my amazing hair girl, Cassie, used regular shampoo and conditioner to wash the extra color out when it was done processing. I didn't realize what a huge difference the baking soda and vinegar made until I used the shampoo and conditioner again. We could feel the residue in my hair from the conditioner when we were done compared to when we first sat down! My hair looked and felt great, but after a couple hours, it was flat, oily and the style had totally fallen out. This just further proved to me how incredible this cheap and easy method is.

Now, there is an adjustment period that lasts about 6 weeks, and let me tell you, it doesn't start out pretty. Your hair has grown accustomed to being absolutely stripped by detergents and then having residue-leaving conditioner caked on in thick globs to make up for it. So when you eliminate that and introduce something a lot gentler, it takes some time to get used to it. My hair felt like straw. I could barely get a brush through the ends of it, but there were a couple things I did that made the transition a little easier. For starters, I didn't rinse the vinegar out for a couple weeks. My hair felt A LOT nicer. Yes, my hair smelled like vinegar while it was still wet but once it dried, it was left just smelling clean. Once I started rinsing out the vinegar again, it was fine. I also used a tiny, TINY bit of coconut oil on the ends which helped immensely.

I HIGHLY recommend trying this out. Give it 2 months and, if you still hate it, then go back to regular shampoo and conditioner. No harm done.


I really hope you check out the original post for more information if you're interested. I shared with you what I thought was relevant, but if you have any questions, please feel free to ask. And please share your experience with "No-poo" if you decide to try it out. I would love to hear how you felt about it.

Monday, May 27, 2013

Creative Combos: Matching Red Hair

shirt: old navy (shop), cardigan: target (old), shorts: altered by me, necklace: lia sophia (old), shoes: rue 21 (old)

I promise I didn't match my hair and my sweater on purpose. I wasn't aware just how close of a match they were until I saw these pictures so I apologize if I look like one huge orange blob.

My boys have beautiful red hair. And I am jealous. So I dye my hair red to match. Okay, maybe its a little brighter than theirs is but its red nonetheless. The problem with dyed red hair is that it fades so quickly. Seriously, one week after you have it done and the color has dulled exponentially. So it's always such a huge pick-me-up every 6 weeks when my girl, Cassie, cakes on the color. I've had a lot of different shades of red going on in the past and I think we finally landed on a keeper. Pretty sure I've always been a red-head at heart, my hair just didn't get the message.


P.S. I'll be posting about an amazing,natural way I maintain my hair color in the next couple days so be sure to check back!

Wednesday, May 22, 2013

Shelf- You guys gotta try this thing!

As many of you know, I'm attempting to be a fashion blogger with an EXTREMELY limited budget. I basically have to rely on the pieces I already own, but I can't help longing for other staples that I would love to add to my wardrobe. I find exactly what I want online, but its WAY too expensive for what I can afford. And I'm not the type of person to sit on my thumbs waiting for it to go on sale. I ALWAYS miss it. That is why this new website is such a game changer for me!  

I first heard about Shelf the other day when my friend, Merrick, posted on her blog about this huge giveaway her and a bunch of other bloggers are doing in celebration of the launch of Shelf (seriously, it's HUGE! Go enter here). Then I received an email last night inviting me to try it out and from what I've seen so far it's amazing!

Let me show you my favorite part about Shelf.

After you've shelved an item, click on it and type in the price you want to pay for it. They have charts for each item that you can use to see how the price has fluctuated in the past and then decide what you are willing to pay for it. 


When the price drops within your alert range, Shelf will email you telling you the new price, the savings and any promo code that you might need.


Isn't that awesome?! And there is so much more to Shelf than that. This short teaser video sort of sums it all up.


Honestly, I'm so excited about this site! I've already purchased a couple things because this site gave me confidence knowing that I was getting a good deal. Below are a couple of things on my Wishlist shelf. Now I'm just waiting for that email letting me know the price has dropped. Check it out and don't forget to head on over to Merrick's Art to enter their amazing giveaway!

Monday, May 20, 2013

Vitamin E Eye Cream


I'm not trying to brag or anything, but I really don't have any eye wrinkles yet. I definitely have some severe under eye circles and some serious bags, but not really any wrinkles. The only reason I'm telling you this is so you know that I can't tell you if this eye cream is effective in that sense. What I WILL tell you is that I love this eye cream anyway. It really improved the texture of the skin around my eyes which made makeup application a breeze. 

I got 12 of these little bitty containers at the dollar store. SUPER handy!

This recipe has only 2 ingredients and no specific measurements so it can't get more simple than that. 

Eye Cream

Coconut Oil

Vitamin-E (I used about 6 capsules for my container)


Fill your container almost all the way full with coconut oil and heat it up for about 30 seconds in the microwave, just until it's a consistency that will lend itself to mixing with another ingredient. Pierce the vitamin E capsules (I used an exacto knife), squeeze the contents into the coconut oil and mix together. Coconut oil solidifies under 76 degrees so it will harden back up as it cools. I told you- simple. The squeezing step is SUPER messy, though! Is there an easier way of going about this that I don't know about?


If you're interested in the health benefits of vitamin E and/or the original recipe, it can be found here. She covers a lot of pros to using vitamin E and it's definitely worth a read. 

Monday, May 13, 2013

Creative Combos: Mother's Day

dress: old navy (shop), leggings: old, sandals: payless (old, similar), necklace: sam moon (sold out, similar, similar)

Yesterday was Mother's Day and boy did my boys spoil me. It was definitely a full day's break from my diet. Cinnamon rolls, tacos, oreo cake, sparkling cider. I think yesterday alone I gained 3 lbs, but it doesn't matter because I felt very loved. I've been a mom for 2 1/2 years now and I've never had so much joy in my life. I can honestly say that O and L are the most amazing little boys and they bring so much happiness and love into my life. Being a mother is all I ever dreamed of being when I was young and it's definitely lived up to all I dreamed it would be. 

I hope all the mommies out there had a wonderful day yesterday and felt as loved as I did. :0)


For a little snippet of what motherhood means to me, you can hope on over to the the Awful Waffle Blog and read a guest post I did over there last month. 

Wednesday, May 8, 2013

DIY Scented Plug-Ins *FAILURE*


I was super excited about this project. With 2 boys in diapers, we need all the air freshening we can get. Needless to say, this was definitely a disappointment. I almost didn't share this experience with you guys, but I thought about it and decided that I would. We all have times when things don't go exactly according to plan and that is nothing to be embarrassed about. Who knows; maybe you have an answer to what I did wrong or why this didn't work out and I can fix my mistake in the future. 

I found this idea on Pinterest and it led me to this blog giving directions to re-use the plug-ins I had laying around my house. It also briefly covered the dangers of the ingredients in store-bought plug-in air fresheners (I had NO idea!). So I was all for giving it a go. You can find the directions I followed here

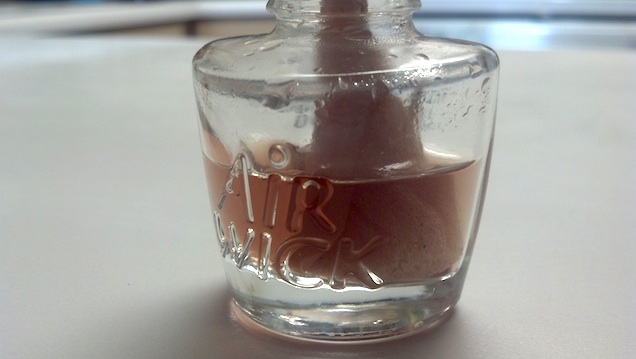
Theoretically, it's a great idea and they did spread their lovely scent around for a day or so, but then this happened:


Maybe it was the brand of plug-ins I used, I don't know, but after a couple of hours, the liquid inside the little glass bulb part started changing colors. Then the wick swelled up and took on this scary dark color. It made me really nervous and it didn't say anything about this happening in what I read so I unplugged them. They might be totally safe, I have no idea, but until I hear otherwise, these are staying away from my outlets. 


Have you had any DIY failures recently?